반응형

이벤트
리액트는 사용자와 상호작용하는 애플리케이션의 핵심인 이벤트를 리액트에서 구현하는 방법이 있다.
이벤트 state props 그리고 render 함수
App.js
import React, {Component} from 'react';
import Subject from "./component/Subject"
import TOC from "./component/TOC"
import Content from "./component/Content"
import './App.css';

class App extends Component {
    constructor(props){
        super(props);
        this.state = {
            mode: 'TEST1', //추가
            TEST1:{title:'TEST1', desc:'this is react test'}, //추가
            subject:{title:'WEB_state TEST', sub:'Hi my name is jin seok'},
            contents:[
            {id:1, title:'TEST2', desc: 'this is react test2'},
            {id:2, title:'CSS_TEST', desc: 'CSS is for design.'},
            {id:3, title:'JavaScript_TEST', desc: 'JavaScript is interactive.'}

            ]
        }
    }
  render (){
      var _title, _desc = null; //변수 추가
    if(this.state.mode === 'TEST1'){//this.state의 mode 키의 값이 TEST1일 경우 아래 함수 실행
    _title = this.state.TEST1.title;
    _desc = this.state.TEST1.desc;
} else if(this.state.mode === 'TEST2'){//this.state의 mode 키의 값이 TEST2일 경우 아래 함수 실행
     _title = this.state.contents[0].title;
      _desc = this.state.contents[0].desc;

}
return (


    <div className="App">
      <Subject title={this.state.subject.title}
       sub={this.state.subject.sub}></Subject>
     <TOC data={this.state.contents}></TOC>
     <Content title={_title} desc={_desc}></Content>//위에서 선언한 변수 _title, _desc 대입

    </div>

  );
 }
}
아래와 같이 mode 키의 값이 TEST1일때와 TEST2일때의 content값이 달리 표시되는 것을 확인 할 수 있다.


이벤트 설치
import React, {Component} from 'react';
import Subject from "./component/Subject"
import TOC from "./component/TOC"
import Content from "./component/Content"
import './App.css';

class App extends Component {
    constructor(props){
        super(props);
        this.state = {
            mode: 'TEST2', //지금의 mode는 TEST2 이다.
            TEST1:{title:'TEST1', desc:'this is react test'},
            subject:{title:'WEB_event TEST', sub:'Hi my name is jin seok'},
            contents:[
            {id:1, title:'TEST2', desc: 'this is react test2'},
            {id:2, title:'CSS_TEST', desc: 'CSS is for design.'},
            {id:3, title:'JavaScript_TEST', desc: 'JavaScript is interactive.'}

            ]
        }
    }
  render (){
      var _title, _desc = null;
    if(this.state.mode === 'TEST1'){
    _title = this.state.TEST1.title;
    _desc = this.state.TEST1.desc;
} else if(this.state.mode === 'TEST2'){
     _title = this.state.contents[0].title;
      _desc = this.state.contents[0].desc;

}
return (


    <div className="App">
    {/*<Subject title={this.state.subject.title}
       sub={this.state.subject.sub}></Subject>*/}
     <header>
     <h1><a href='/' onClick={function(e){
     // onClick은 리액트만의 기능 언어이다.
     //그냥 onclick과 비슷하지만 다르다.
    console.log(e);
    e.preventDefault(); //e.preventDefault();을 통해 페이지가 자동으로 리로드가 안되도록한다.
    this.setState({ // this.setState 또한 리액트만의 기능이다. 리액트에서 state의 값들을
                    // 바꾸고 싶다면 리액트에서는 이 기능을 쓰라는 뜻이다.
    mode: 'TEST1'
    });
    }.bind(this)}>
    //onClick의 콜백 함수 안에 있는 this는 외부에서 접근하지 못하여 따로 .bind 해줘야한다.
    {this.state.subject.title}</a></h1>
     {this.state.subject.sub}
    </header>
     <TOC data={this.state.contents}></TOC>
     <Content title={_title} desc={_desc}></Content>

    </div>

  );
 }
}


export default App;
WEB_event TEST 링크를 클릭했더니 mode키의 값이 TEST1으로 바뀌면서 반응한다는 것을 확인 할 수 있다.

컴포넌트 이벤트 만들기
App.js
import React, {Component} from 'react';
import Subject from "./component/Subject"
import TOC from "./component/TOC"
import Content from "./component/Content"
import './App.css';

class App extends Component {
    constructor(props){
        super(props);
        this.state = {
            mode: 'TEST2',
            TEST1:{title:'TEST1', desc:'this is react test'},
            subject:{title:'WEB_event TEST', sub:'Hi my name is jin seok'},
            contents:[
            {id:1, title:'TEST2', desc: 'this is react test2'},
            {id:2, title:'CSS_TEST', desc: 'CSS is for design.'},
            {id:3, title:'JavaScript_TEST', desc: 'JavaScript is interactive.'}

            ]
        }
    }
  render (){
      var _title, _desc = null;
    if(this.state.mode === 'TEST1'){
    _title = this.state.TEST1.title;
    _desc = this.state.TEST1.desc;
} else if(this.state.mode === 'TEST2'){
     _title = this.state.contents[0].title;
      _desc = this.state.contents[0].desc;

}
return (


    <div className="App">
    <Subject
    title={this.state.subject.title}
    sub={this.state.subject.sub}
    onChangePage={function(){ //이제 props의 컨퍼넌트 기능을 이용하여 event을 설치하였다.
     this.setState({mode: 'TEST2'});
    alert('This is event test');}.bind(this)}>
    </Subject>
     <TOC data={this.state.contents}></TOC>
     <Content title={_title} desc={_desc}></Content>

    </div>

  );
 }
}


export default App;
Subject.js
import React, {Component} from 'react';


class Subject extends Component {
    render (){
  return (

     <header>
     <h1><a href='/' onClick={function(e){ //따로 props을 이용해 분리해둔 Subject.js에서 onClick
                                           // 함수를 적용시킨다.
      e.preventDefault();
    this.props.onChangePage();}.bind(this) //이와같이 props을 통해 값을 가져오는 것처럼 onChangePage의
                                           // 함수 이벤트 값을 가져온다.
    }>{this.props.title}</a></h1>
     {this.props.sub}
    </header>

  );
}
}
export default Subject;
이와 같이 Subject의 WEB event TEST 링크를 클릭하자 이벤트들이 실행되는 것을 확인 할 수 있다.

컴퍼넌트 이벤트 총집합 응용
App.js
import React, { Component } from 'react';
import TOC from "./components/TOC";
import Content from "./components/Content"
import Subject from "./components/Subject"
import './App.css';
class App extends Component {
  constructor(props){
    super(props);
    this.state = {
      mode:'TEST1', //초기 화면의 모드는 TEST1이다.
      selected_content_id:2,
      subject:{title:'WEB event TEST', sub:'this is test start'},//초기 화면에 나올 subject
      TEST1:{title:'TEST1', desc:'this is test1'}, //초기 화면에 나올 값
      contents:[ //TEST2가 되면 content 배열이 발동된다.
        {id:1, title:'TEST2-1', desc:'HTML is for information'},
        {id:2, title:'TEST2-2', desc:'CSS is for design'},
        {id:3, title:'TEST2-3', desc:'JavaScript is for interactive'}
      ]
    }
  }
  render() {

    var _title, _desc = null;

    //여기 아래에 if문을 통해 TEST1, TEST2 일때 각각 실행될 함수 있다.

    if(this.state.mode ===  'TEST1'){ //TEST1일때
      _title = this.state.TEST1.title;//TEST1 객체를 값으로 이용한다.
      _desc = this.state.TEST1.desc;
    }

    else if(this.state.mode === 'TEST2'){//TEST2일때
      var i = 0;
      while(i < this.state.contents.length){//contents 배열을 값으로 이용한다
        var data = this.state.contents[i];
        if(data.id === this.state.selected_content_id) {
        //selected_content_id의 id 값에 따라 mode 값이 TEST2일때
        //content의 배열 중 어떤 값이 들어갈지 결정난다.
          _title = data.title;
          _desc = data.desc;
          break;
        }
        i = i + 1;
      }
    }
    return (
      <div className="App">

      //subject 컴퍼넌트에 링크를 걸어주었다. 링크를 눌렀을때 mode가 TEST1으로 바뀌도록 이벤트화했다.
        <Subject
          title={this.state.subject.title}
          sub={this.state.subject.sub}
          onChangePage={function(){
            this.setState({mode:'TEST1'});
          }.bind(this)}
        >
        </Subject>

      <!--TOC 컨퍼넌트에도 클릭 이벤트화 하여 클릭했을때 가져오는 당시마다 달라지는 id값에 따라
      state 부분에 있는 selected_content_id의 id값이 변화하도록 하였다.-->
        <TOC
          onChangePage={function(id){
            this.setState({
              mode:'TEST2',
              selected_content_id:Number(id)
            });
          }.bind(this)}
          data={this.state.contents}
        ></TOC>
        <Content title={_title} desc={_desc}></Content>
      </div>
    );
  }
}
export default App;
TOC.js
import React, { Component } from 'react';

class TOC extends Component{
    render(){
      console.log('TOC render');
      var lists = [];
      var data = this.props.data;
      var i = 0;
      while(i < data.length){
        lists.push(
    //<li>마다 링크를 걸어줘 마찬가지로 클릭하면 설정한 이벤트가 발생한다.
       <li key={data[i].id}>
          <a
           href={"/content/"+data[i].id}

       onClick={function(id, e){
       //bind 메소드로 인하여 data[i].id이 첫번째 인자 id에 매개변수로서 들어감. 기존의
       //매개변수 e 는 뒤로 한 칸 씩 밀린 것이다.

      e.preventDefault();

       this.props.onChangePage(id); //props으로 onChangePage(id)을 통해 id 값도 넘겨줌.

       }.bind(this, data[i].id)}
       //bind 메소드의 두번째 인자부터는 바인드 한 함수의 인자로 삽입해주는 기능을 가지고있다.

       >{data[i].title}</a>
          </li>);
        i = i + 1;
      }
      return (
        <nav>
            <ul>
                {lists}
            </ul>
        </nav>
      );
    }
  }
export default TOC;
subject.js
import React, { Component } from 'react';
class Subject extends Component {
    render(){
      console.log('Subject render');
      return (
        <header>

            <h1><a href="/" onClick={function(e){
              e.preventDefault();
              this.props.onChangePage();
            }.bind(this)}>{this.props.title}</a></h1>
            {this.props.sub}
        </header>
      );
    }
  }
export default Subject;
content.js
import React, {Component} from 'react';


class Content extends Component{
  render(){
    return (
      <article>
          <h2>{this.props.title}</h2>
          {this.props.desc}
      </article>
    );
  }
}
export default Content;
초기 화면

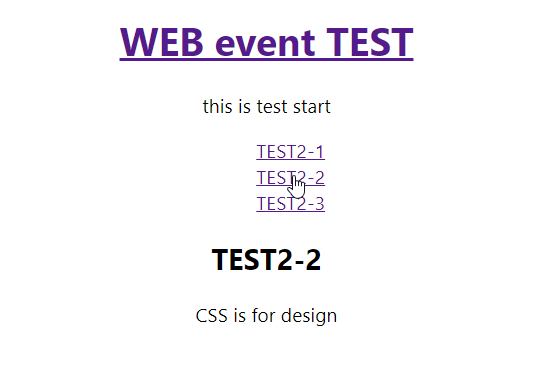
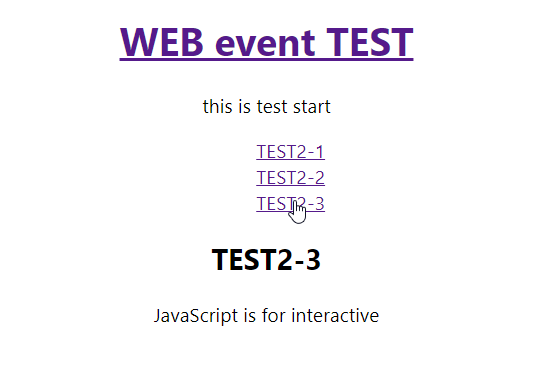
<li> 부분들의 링크를 클릭하면 각자 설정한 id값에 따라 이벤트 반응으로 변동되는 것을 볼 수 있다.


반응형
'프로그래밍 개발 > ReactJs' 카테고리의 다른 글
| ReactJs - Update , Delete기능 구현하기 (0) | 2021.01.04 |
|---|---|
| ReactJs - Create 기능 구현 (0) | 2021.01.04 |
| ReactJs - state (0) | 2020.12.31 |
| ReactJs - 컴포넌트 제작하기 (0) | 2020.12.30 |
| React.js - 리액트 개발 환경 구축하기 (0) | 2020.12.30 |


댓글