반응형
Redux 구현하기
1. store 생성
<!DOCTYPE html>
<html>

<head>
    <script src="https://cdnjs.cloudflare.com/ajax/libs/redux/4.0.1/redux.js"></script>
</head>

<body>
    <style>
        .container {
            border: 5px solid black;
            padding: 10px;
        }
    </style>
    <div id="red"></div>
    <script>
    //reducer을 통해 state 값을 정해주었다. 즉 store 생성
function reducer(state, action){
    if(state === undefined){ //state가 undefined일때 실행되는 이유는 초기화(수정)를 통한 최초로 실행될 reducer의 호출이기 때문.
        return {color:'yellow'} //초기는 yellow 상태이지만 이곳만 수정도록 하면 다른 state들을 한꺼번에 수정 가능
    }
}
var store = Redux.createStore(reducer); //Redux 적용. store 변수 지정해줌.
function red() {
    var state = store.getState(); //store에서 getstate 메소드를 이용하여 reducer 함수에서 리턴값 가져옴
    document.querySelector('#red').innerHTML = `
        <div class="container" id="component_red" style="background-color:${state.color}"> //초기 컬러 지정함.
            <h1>red</h1>
            <input type="button" value="fire" onclick="
            document.querySelector('#component_red').style.backgroundColor = 'red';
            document.querySelector('#component_green').style.backgroundColor = 'red';
            document.querySelector('#component_blue').style.backgroundColor = 'green';
            ">
        </div>
    `;
}
red();

    </script>
</body>

</html>
2. reducer와 action을 이용해서 새로운 state 값 만들기
<!DOCTYPE html>
<html>

<head>
    <script src="https://cdnjs.cloudflare.com/ajax/libs/redux/4.0.1/redux.js"></script>
</head>

<body>
    <style>
        .container {
            border: 5px solid black;
            padding: 10px;
        }
    </style>
    <div id="red"></div>
    <script>
function reducer(state, action){
    console.log(state, action);
    if(state === undefined){
        return {color:'yellow'}
    }
    var newState;
    if(action.type === 'CHANGE_COLOR'){
          //여기서 state 값을 일부러 assign을 통해 복제한 결과를 리턴해주었는데 복제를 한 이유는
          //리덕스를 사용하는 여러가지 효용을 더 원활하게 사용하기 위함이다.
        newState = Object.assign({}, state, {color:'red'});
    }
    return newState;
}
var store = Redux.createStore(reducer);
function red() {
    var state = store.getState();
    document.querySelector('#red').innerHTML = `
        <div class="container" id="component_red" style="background-color:${state.color}">
            <h1>red</h1>
            <input type="button" value="fire" onclick="
                               //type은 필수이며 약속이다.
                store.dispatch({type:'CHANGE_COLOR', color:'red'});
            ">
        </div>
    `;
}
red();

    </script>
</body>

</html>
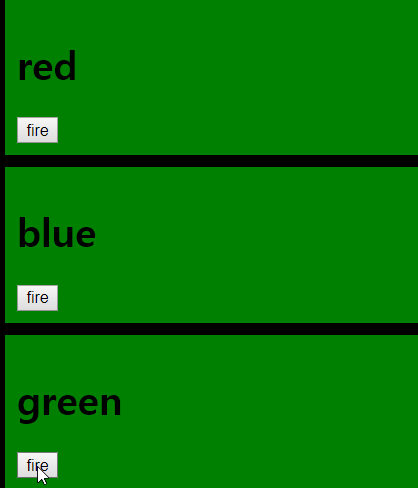
3. state의 변화에 따라서 UI 반영하기
<!DOCTYPE html>
<html>

<head>
    <script src="https://cdnjs.cloudflare.com/ajax/libs/redux/4.0.1/redux.js"></script>
</head>

<body>
    <style>
        .container {
            border: 5px solid black;
            padding: 10px;
        }
    </style>
    <div id="red"></div>
    <div id="blue"></div> //추가
    <div id="green"></div>//추가
    <script>
function reducer(state, action){
    console.log(state, action);
    if(state === undefined){
        return {color:'yellow'}
    }
    var newState;
    if(action.type === 'CHANGE_COLOR'){  //이제 state이가 반응하여 바뀔때마다 컬러가 자동으로 바뀌게끔 하였다.
        newState = Object.assign({}, state, {color:action.color});
    }
    return newState;
}
var store = Redux.createStore(reducer);
function red() {
    var state = store.getState();
    document.querySelector('#red').innerHTML = `
        <div class="container" id="component_red" style="background-color:${state.color}">
            <h1>red</h1>
            <input type="button" value="fire" onclick="
                store.dispatch({type:'CHANGE_COLOR', color:'red'});
            ">
        </div>
    `;
}
store.subscribe(red); //state의 값이 바뀔때마다 .subscribe메소드를 이용하여 UI가 반응하도록 하였다.
red();

function blue() {
    var state = store.getState();
    document.querySelector('#blue').innerHTML = `
        <div class="container" id="component_blue" style="background-color:${state.color}">
            <h1>blue</h1>
            <input type="button" value="fire" onclick="
                store.dispatch({type:'CHANGE_COLOR', color:'blue'});
            ">
        </div>
    `;
}
store.subscribe(blue);
blue();

function green() {
    var state = store.getState();
    document.querySelector('#green').innerHTML = `
        <div class="container" id="component_green" style="background-color:${state.color}">
            <h1>green</h1>
            <input type="button" value="fire" onclick="
                store.dispatch({type:'CHANGE_COLOR', color:'green'});
            ">
        </div>
    `;
}
store.subscribe(green);
green();

    </script>
</body>

</html>


리덕스를 이렇게 이용하면 state를 가져오기, 쓰기의 역할이 각자 정해짐으로 인해서 오는 한 번 수정을 위해 모든 state을 수정하는 것이 아닌 각각의 정리가 가능해졌으며 state변화를 알려주기때문에 그 사이에 다른 작업을 할 수 있게 되었다. 컴포넌트 작업에 용이, 정해진 방법대로 state를 관리하면 다른 component를 신경쓸 필요없어졌다.
반응형
'프로그래밍 개발 > Redux' 카테고리의 다른 글
| Redux - Redux로 간단한 웹사이트 구현하기 (0) | 2021.01.23 |
|---|---|
| Redux - Redux란? (0) | 2021.01.23 |


댓글